

.avif)

I recently implemented the Viz App's first image hosting architecture. While it's fresh in my mind - I'll walk you through the considerations to make when getting an image from your user's device, into an object store like S3, and back onto another user's display.
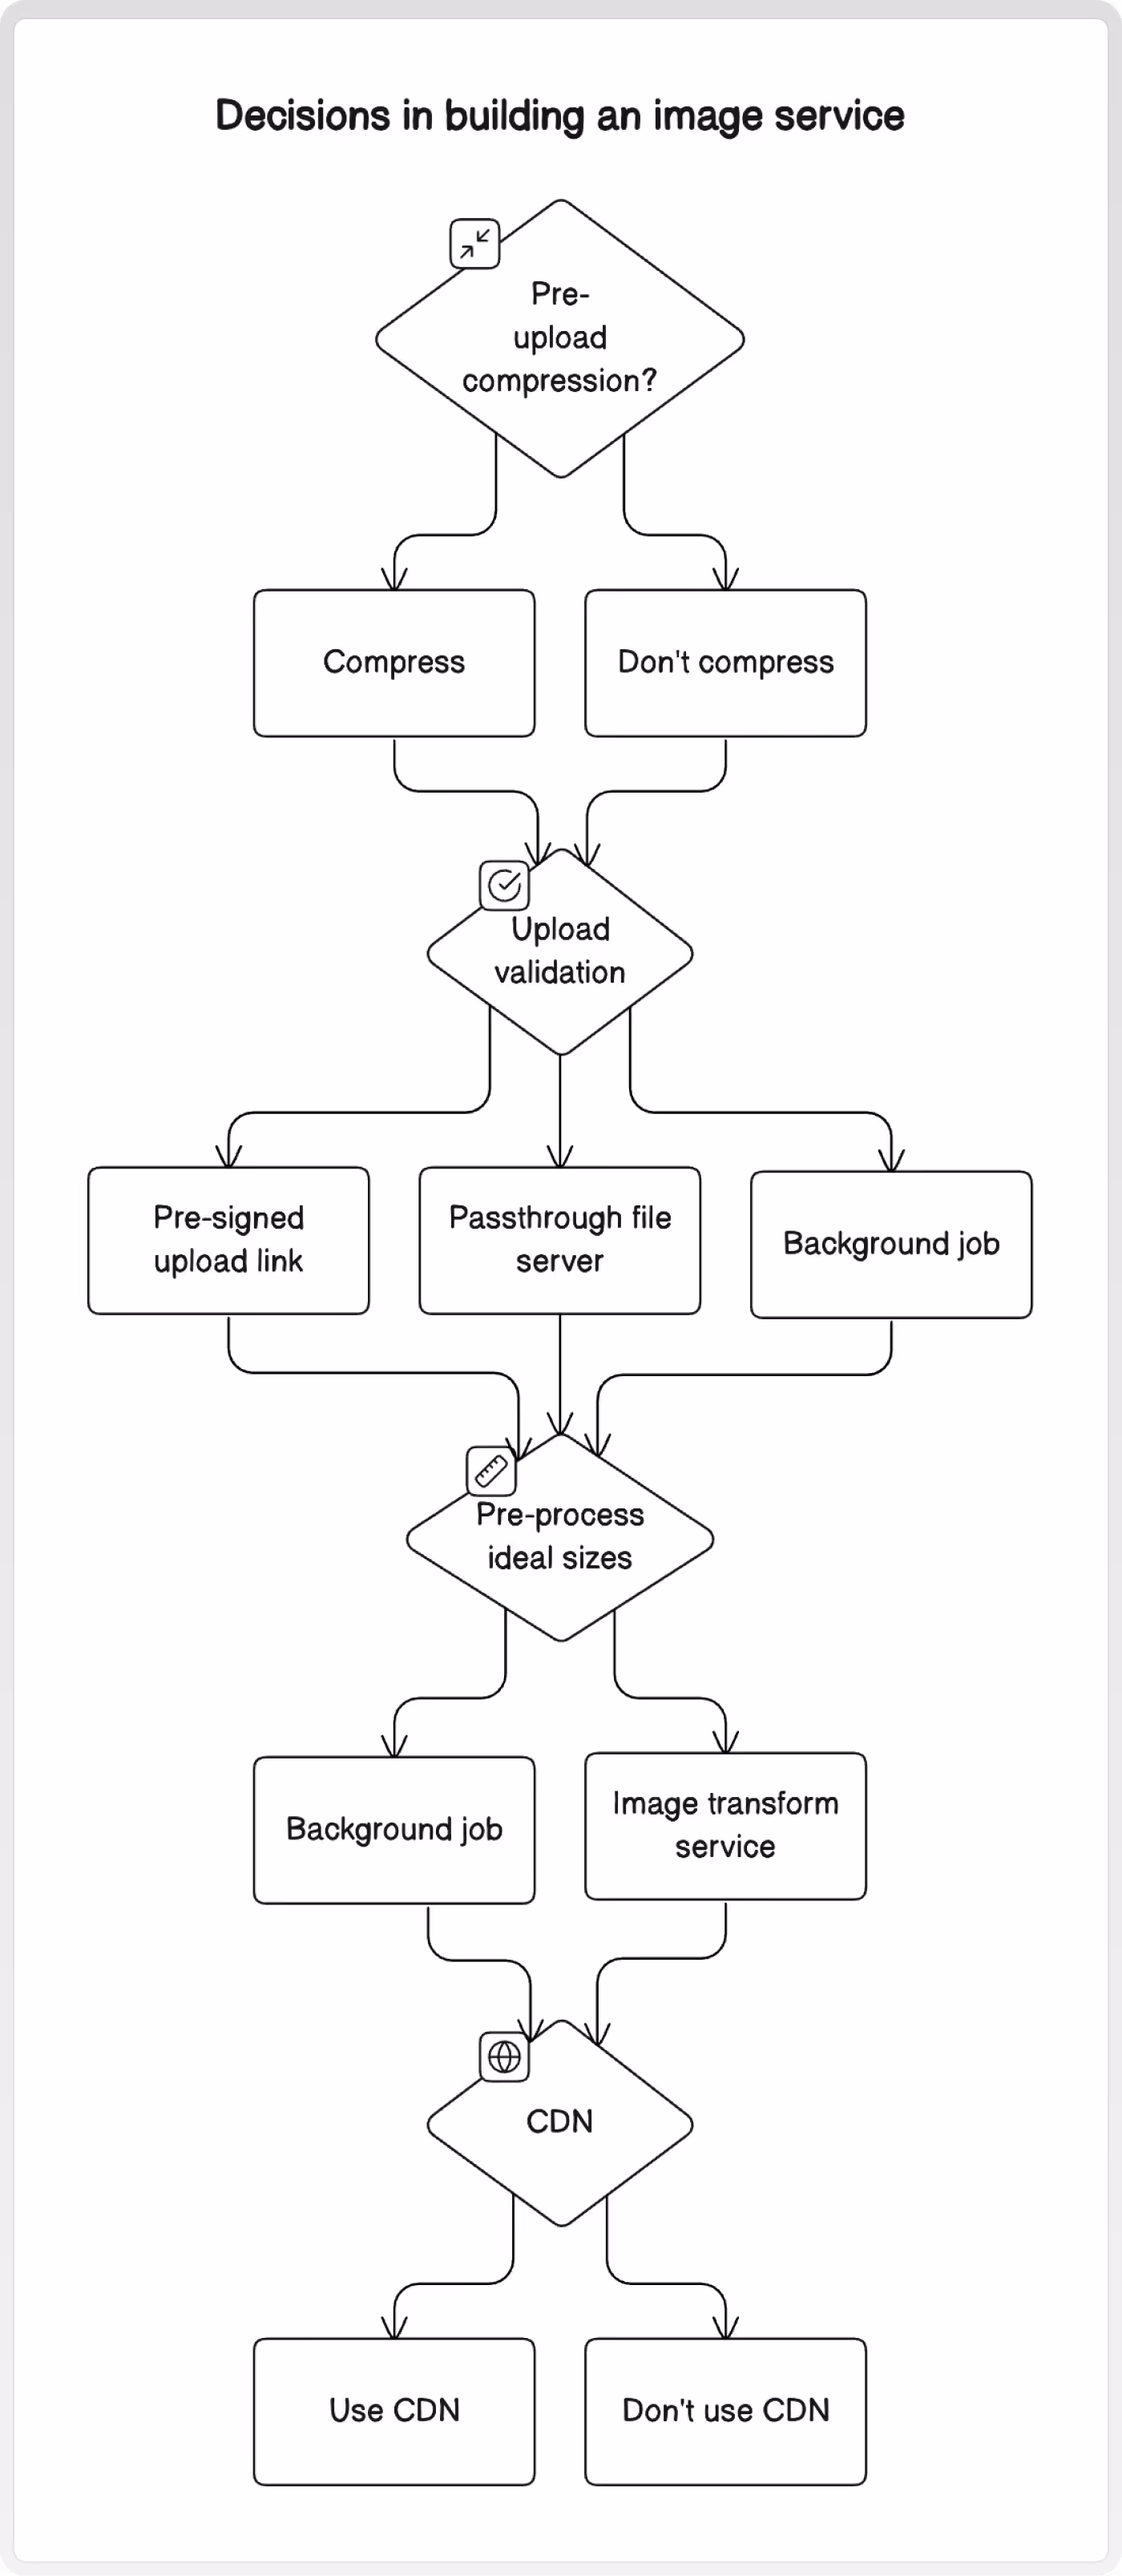
We'll look at four key optimizations, investigating the techniques available at each phase and discussing their trade-offs:
- Reducing image sizes before uploading
- Validating uploads
- Pre-processing ideal sizes
- Using CDNs
Context
Before we dive in, here is some context on the Viz App itself, and why image architecture warrants such different considerations in the first place!
The Viz App
The Viz App is used by divers to share daily water visibility and ocean conditions with each other. Users lookup the latest conditions at their local dive sites before heading out, then add their own report afterwards to help the next diver. Check it out at viz-app.com if you're keen!
A picture is worth a thousand words, so I wanted to let users add images from their dives to help convey the conditions better. Also... it's fun to share photos of rare critter sightings and instil ultimate FOMO in your fellow divers!
Tech Stack
The app is written using Kotlin Multiplatform (KMP) for shared code in the data, network, and business logic layers. The frontend UIs are written natively using SwiftUI for iOS and Jetpack Compose for Android.
The backend server is written in Kotlin and uses the Ktor framework. Data is stored in a MySQL database, and images are stored in an S3 equivalent object store. Finally, the application is deployed in the cloud on VMs running docker.
Why Images are Different
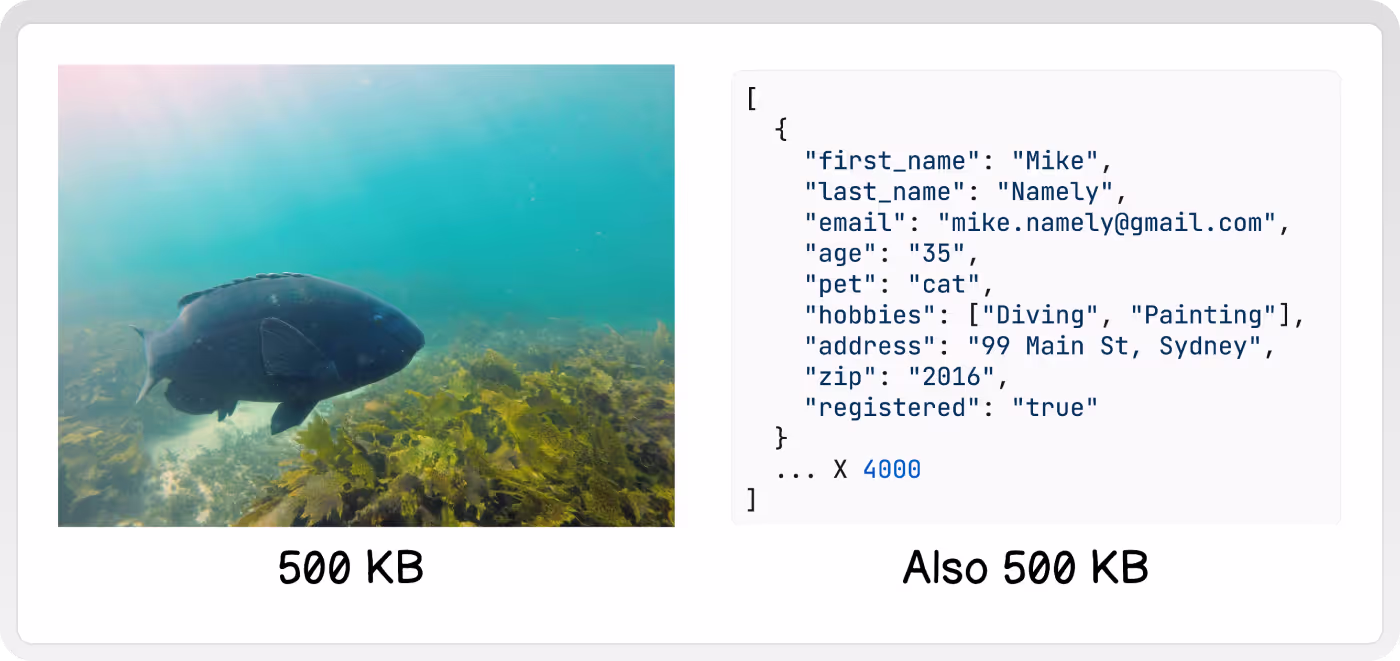
The main problem with images is that they are large. For example, this poorly taken photo of a friendly Blue Groper that I snapped on my 10-year-old camera is roughly the same size as this JSON array with 4,000 elements. (Both are about 500 KB)
This size introduces performance, cost, and security concerns that warrant a different architecture than the rest of the data being served by a typical web app. In particular, there are a few optimizations we want to make -
- Reducing image sizes before uploading
- Validating uploads
- Pre-processing ideal sizes
- Using CDNs
Thankfully, we can sprinkle in these optimizations during many different phases of the image lifecycle to accommodate a wide array of architectures.
Pick your Pieces
There are lots of options for how to add these optimizations. I suggest picking ones that are easy to implement with the architecture you already have. If you're working on a brand new app - then start with the simplest ones, and only add as much as you need!
1. Pre-Upload Image Compression
Because the main factor impacting performance & cost is size, one of the best things we can do is shrink images as much as possible.
Resize
A good start is resizing images that are above a certain threshold. An image taken on a nice camera might have a level of detail & quality that your users will never appreciate scrolling on their phones! In 2024, I recommend copying Instagram's maximum at 1080 pixel width.
Compress
Furthermore, compressing images with formats like JPG and WebP can reduce the size by a factor of 10 with virtually no noticeable differences.
Showing an example of compression online is a bit like shopping for a 4K TV on your phone. I recommend compressing a test image from your own phone at ezgif.com/optiwebp . That way you can see the magic for yourself!
Note: If users are uploading already compressed images, you might not see a big improvement.
Why: Massively reducing the size of images will also reduce how long it takes users to upload images. Reducing the size here also minimizes all other downstream costs and loads that will occur.
Why Not: You might have a reason that you want the highest quality images possible. In this case, you would want to preserve the highest quality image in you object store, and later generate smaller compressed thumbnails for views where less detail is required.
2. Upload Validation
Whether malicious or accidental, there are several things we want to protect our system from -
- Extreme size or volume of images causing expensive storage costs
- Extreme size or volume of images overwhelming the system, making the service unavailable
- Malicious or unwanted content getting stored on the system
Here are three options to validate image uploads -
A. Pre-signed upload URLs
Most object store services (such as S3) will allow your server to generate a unique pre-signed URL to give to clients. This url allows them to upload directly to the object store. This way, the load and bandwidth entirely skips your system's infrastructure.
The URLs have an expiry time that limits how long a client can use them to upload. Additionally, the URL can specify file size, type, and hash values that must match the ultimately uploaded file.
Note: The extent of validations and rules can vary greatly between different cloud providers. Also, these implementations generally rely on HTTP header values, which can easily be overwritten by the person making the request!
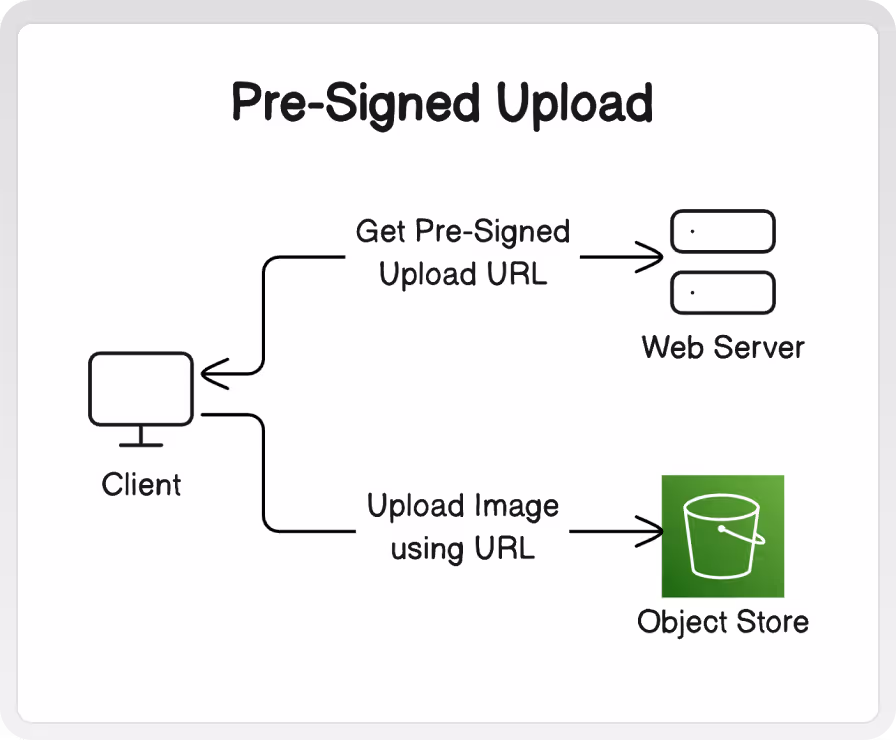
The diagram above helps reveal another benefit to this approach - the upload itself skips the majority of your backend and is handled by the object store directly. The size of image data leads to longer request durations, greater disk utilization, and greater memory utilization than a typical web request. Using direct uploads can isolate this load to the object store, without having to consider any other service or resource boundary within the rest of your system. Additionally, object store services tend to have a default high level of availability, with out needing to further configure auto-scaling or over-provisioning.
Why: Zero load & bandwidth required by your own application servers. Isolate the upload architecture without having to add any new server configurations or services.
Why Not: Any client-side validations are inherently out of your control, and act more as a deterrence than a prevention. If you have a low tolerance for storing unwanted files - security, compliance, cost, or otherwise.
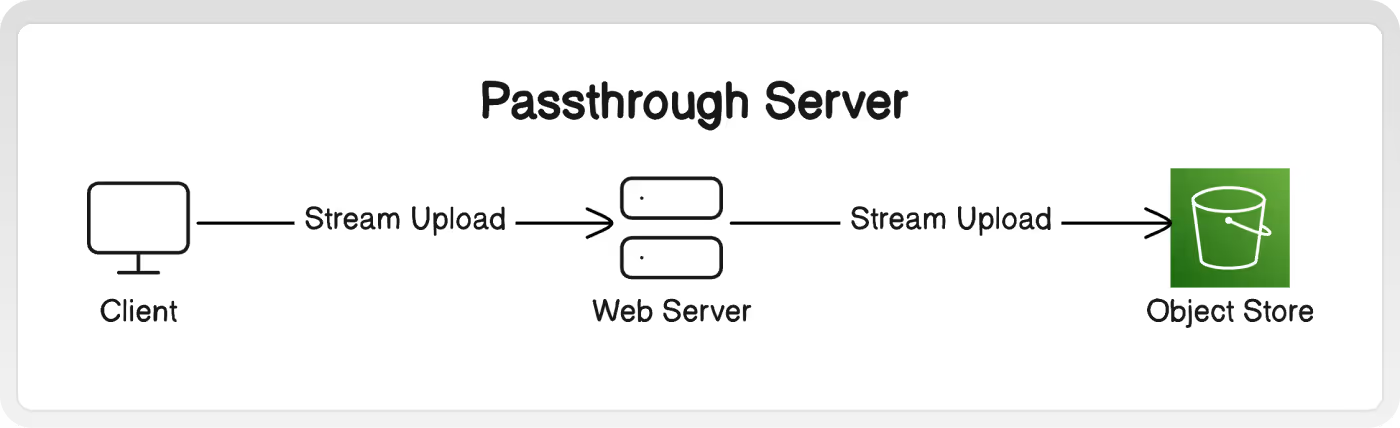
B. Passthrough File Server
Passing uploads through our own server before ultimately storing them in object storage (like S3) gives us an opportunity to mitigate these risks. We can implement rate limiting, file type checking, file size cutoffs, and other validation before committing to storing the uploads in our object store.
However, it comes at the cost of bringing the load into our system. In particular, we are concerned about memory and disk usage on the servers while processing uploads.
Streams
One way to minimize the impact is to use passthrough streams. Instead of waiting to fully receive an upload from our client, processing it, then uploading to the object store -- we will simultaneously upload each packet to the object store as we receive it from the client. In this way, the memory pressure from an upload is limited only to the size of the intermediary buffer, not the entire upload.
Imagine trying to deliver water from a reservoir, to a treatment plant, then to a house using only tanker trucks. Each stop would need to have enough storage to accept the entire truckload. You would also have to wait for the entire truck's contents to be unloaded before moving on to the next step. Using a stream is like using a pipeline that's continuously flowing instead.
Using streams - validations can be performed on each piece of the image data as the server receives it. This allows the server to terminate connections if the total number of bytes read has exceed the maximum size. Conversely, non-streaming validations often require receiving an entire file before validating it's size and content.
Why: Using your own server lets you choose the exact degree of validation you care about. Streaming techniques mitigate most load issues.
Why Not: Additional cost and effort of running your own server. Additional architecture overhead of adding a new server configuration or service. Need to over-provision or auto-scale to match the availability of object store services.
C. Background Job
Files can be checked after they are uploaded by a background job. After being notified by a web server event, listening to changes in the object store, running on a schedule, or some other trigger - the job will analyze new files and remove them if they are too large, malicious, unsupported types, etc.
Because the job is asynchronous, it can perform slower more complex validations without blocking other parts of the app. This can be useful if you want to run content moderation that requires pulling the entire image into memory to check for prohibited visuals.
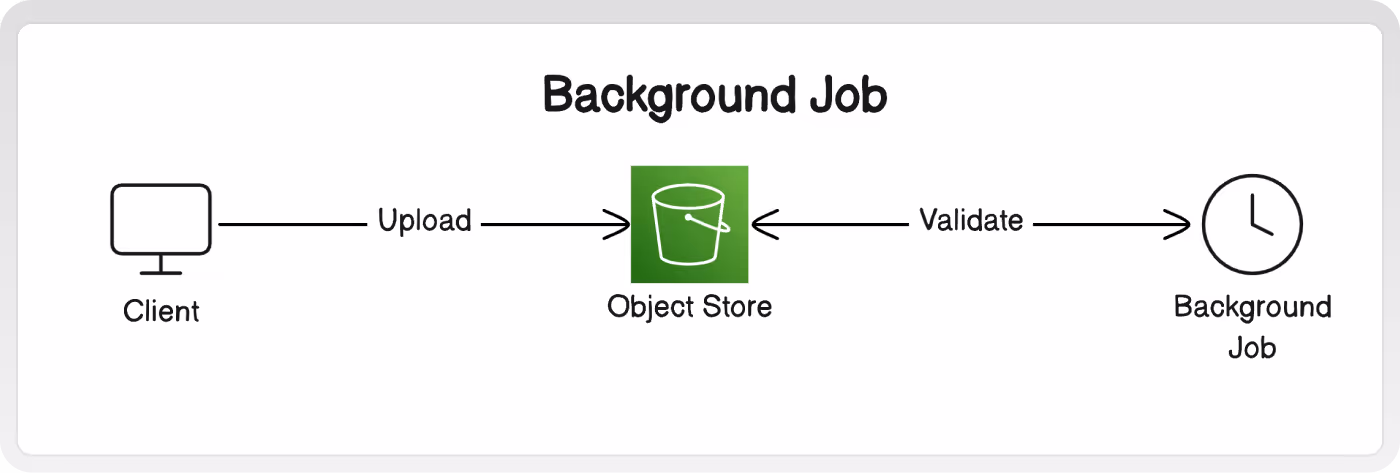
Why: You already have event-based architecture or a system for running background jobs. You want to run especially thorough, visual-level validations.
Why Not: All the classic drawbacks of an async system - complexity, lag, error handling, etc.
3. Pre-processing Ideal Sizes
Often, the majority of the images an app needs to display are thumbnails and small previews. Sending images that are higher quality than necessary for this view will both waste bandwidth and cause the client to spend processing time & memory resizing them anyways.
Instead, we can send images that are already the correct size and quality that the client needs to display. If the client opens up a more detailed display afterwards, then a subsequent request can be made for the original, full-size image.
Here are two options for pre-processing -
A. Background Job
A background job can be used to periodically make multiple re-sized versions of original images. When a client requests images for a thumbnail display, then the correctly sized pre-made images will be retrieved accordingly.
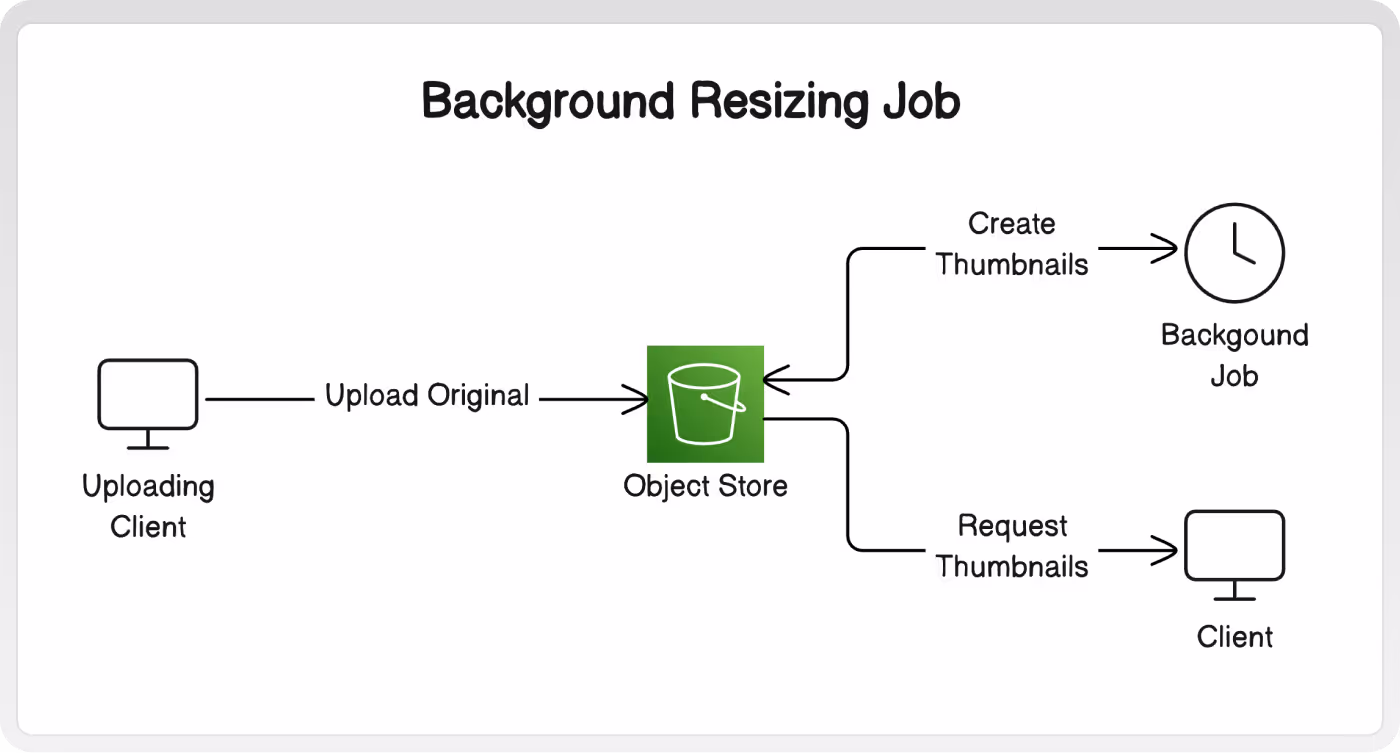
Why: Resizing ahead of time means thumbnails are available immediately on request.
Why Not: Your use case might require many custom or flexible sizes (for example - a blogging platform would have standard thumbnails and hero images, but a free-form canvas would not.) With many different clients and screen sizes, it won't be possible to generate every perfect size. Thumbnails won't be available until after the job has processed the original.
B. Image Transform Service
Images can also be resized on the fly. When a client needs to display some images, it can include the exact dimensions it wants to display when making the request. When the image service receives the request, it retrieves the original image from the object store, performs the resizing and any other transformations, then returns the new ideal image to the client.
To avoid processing the same image for every identical request, use a CDN so that the ideal image is cached outside your system. Read on to the next section for more details!
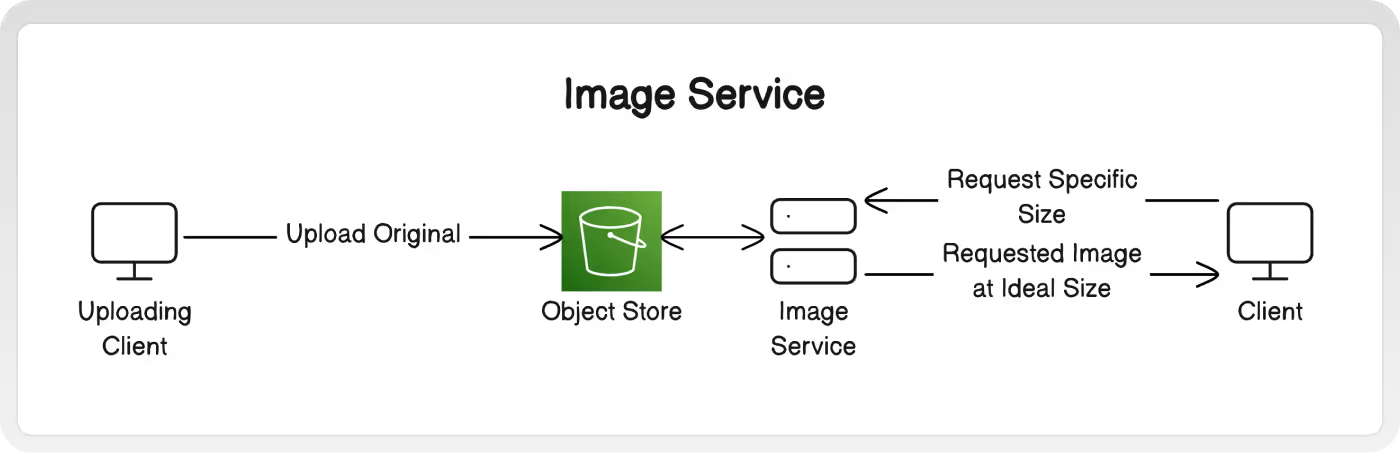
Why: Resizing in realtime allows the client to specify the exact ideal dimensions.
Why Not: If most image requests are unique (not shown to many users, often different sizes, etc.) then the CDN won't be able cache responses.
4. CDN
Using a CDN is the fastest way to improve download speeds for users. These networks distribute content to caches physically near users.
Caching Benefits
Subsequent requests for the same image are quicker for the user, since the image is hosted closer to them physically.
Additionally, the requests are never routed to your object store, since they are already fulfilled by the caches. This can lead to considerable cost savings, as the CDN fees are usually less than the first-hop transfer fee out of your object storage.
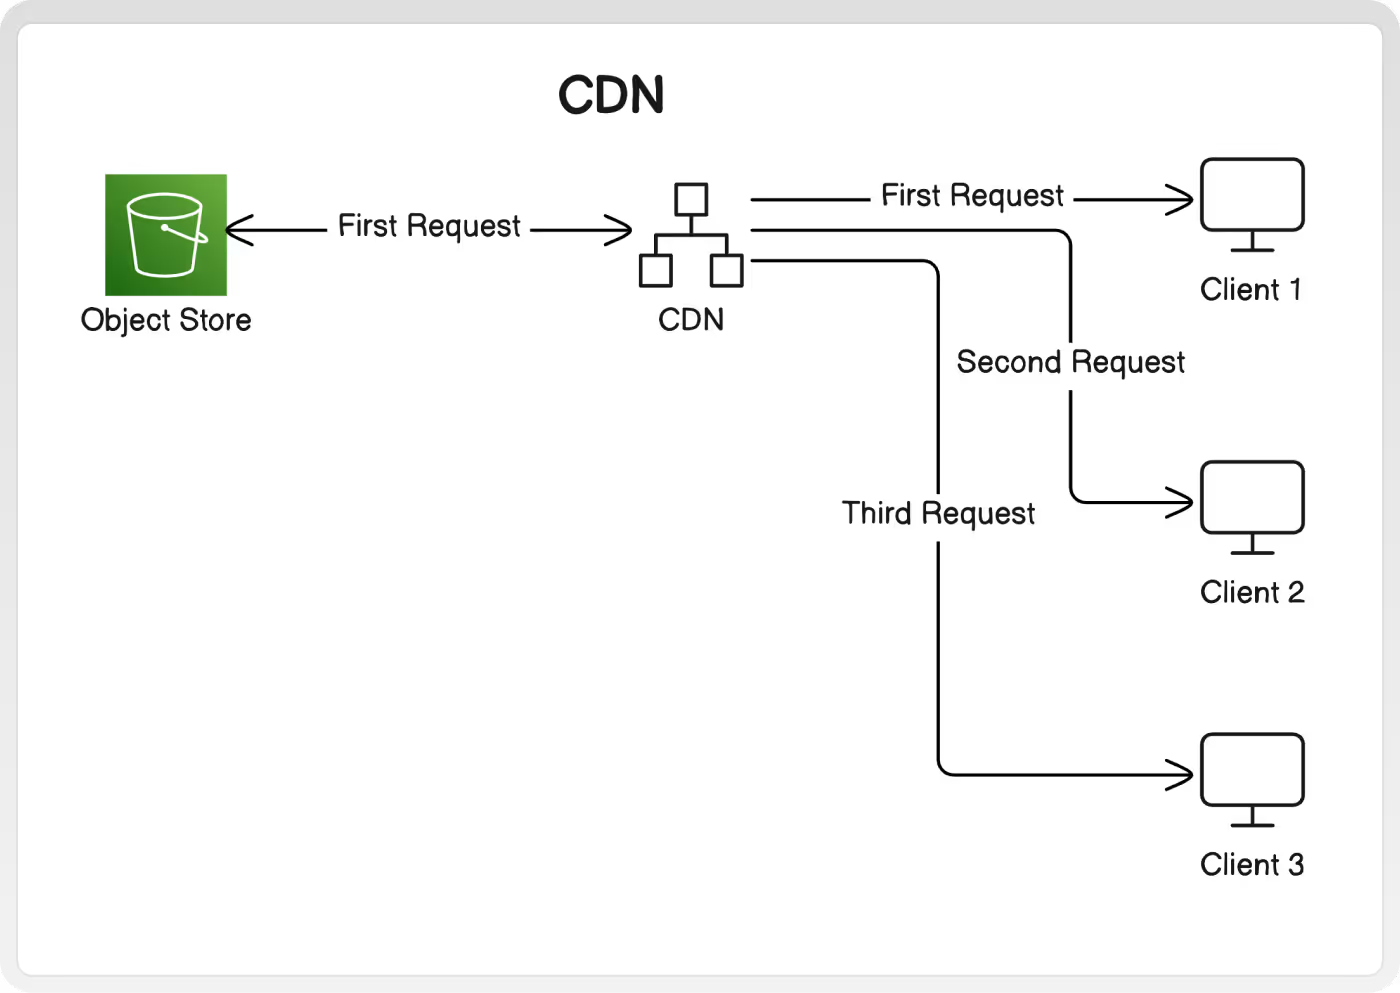
Why: Improve download speeds for users. Any processing or transfer costs from your system only occur on the first request.
Why Not: The benefit of caching decreases as uniqueness increases. Some images may be requested infrequently, or only by a small number of users anyways. Might not work with some access/auth implementations (see the next section!).
Important Considerations when Pre-signing URLS
Limit Access with Pre-signing
Images in an object store can be shared with users by simply giving them the URL to directly access the image (https://s3.amazonaws.com/my-bucket/my-image.jpg ). However, anyone with the url can access the image. Additionally, the URLs of the images might be guessable (image-1.jpg, image-2.jpg, etc.)
Access can be limited by using pre-signed URLs instead. When the web-server prepares the list of URLs to send to clients, it uses a secret key registered with the object store to create new unique, non-guessable URLs. Additionally, these URLs can be configured to expire after an amount of time.
It's still the case that anyone with the new pre-signed URL will be able to access the image. However, we can share that URL with only the users that we authenticate and/or authorize.
Issues with pre-signed URLs
However, using pre-signed URLs with a CDN can result in guaranteed cache misses! If you are giving every user a unique URL, then the CDN cache will not recognize them as duplicate requests for the same image.
Note: The extent of this issue depends on your cloud provider's implementation.
Align cache with pre-signed access level
To benefit from the CDN, you should create pre-signed urls at a level of uniqueness that matches the intended access.
For example - assume you want any signed-in user to be able to see any of the images that other users have posted. To do so, generate a pre-signed url the first time an image is requested, cache the url in your web-server, then give any subsequent users the same pre-signed URL. The cache expiry and pre-signed url expiry are set to the same time-period.
Note: If your app is hosting sensitive content, and you want to restrict access on a very granular per-user level, then you won't be able to benefit from a CDN. It should be noted that if only a small number of users are even allowed to see an image, then you likely won't experience a heavy network load from hosting that image anyways.
TL;DR
Here's a quick guide for addressing each of the optimizations we discussed! Remember to favour choices that align with your existing architecture, and try not to do more than than is necessary.
Step 1: Compress
- Before uploading, resize and compress images to the highest display quality used in the app.
Step 2: Validate
- Depending on your tolerance for storing unwanted files - use either a passthrough server, pre-signed URLs, HTTP headers, background jobs, or some combination to limit uploads.
Step 3: Pre-Process Ideal Sizes
- If your app will show a wide variety of image sizes and quality, allow clients to request their desired size through an image service.
- Alternatively, use a background job to prepare general-purpose sizes ahead of time.
Step 4: Use a CDN
- Route image requests through a CDN, so that subsequent requests will be fulfilled by the network cache, and skip your object store all together.
- Be mindful to use pre-signed URLs in a way that won't miss the CDN's cache.
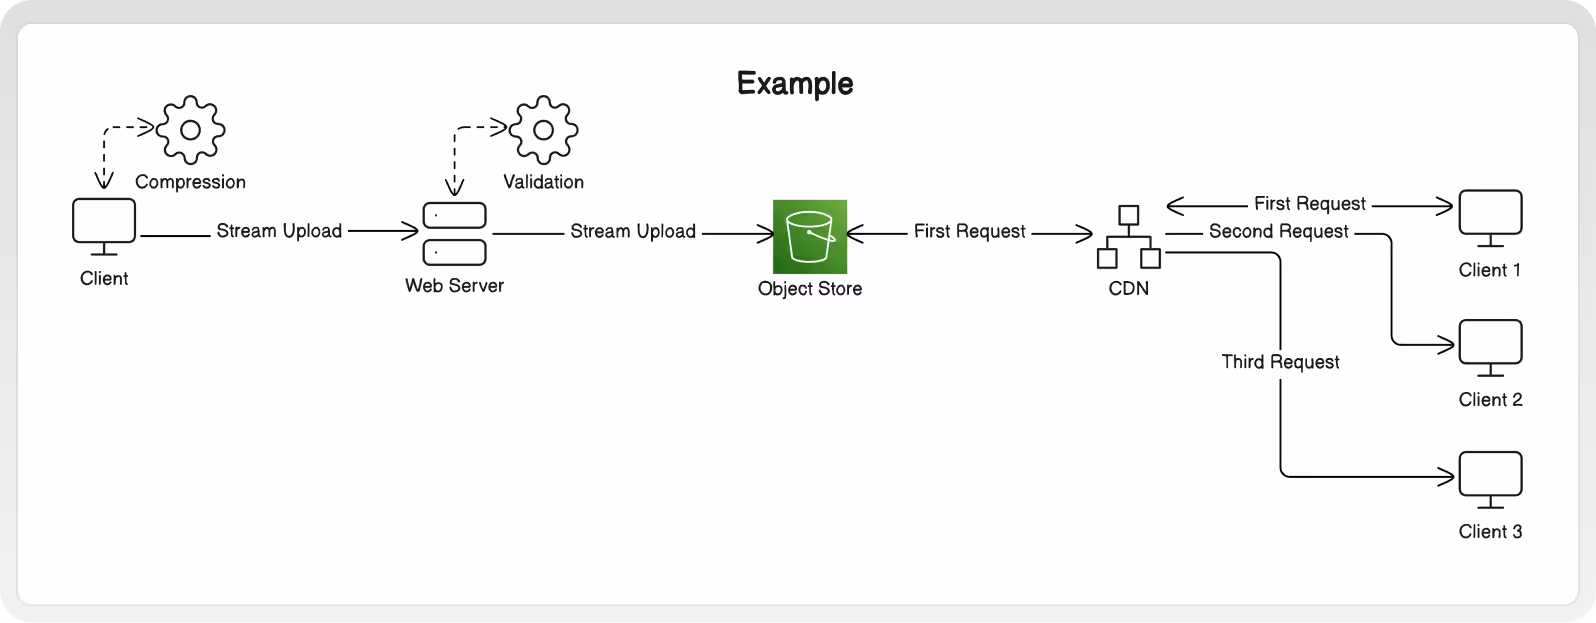
Here is an end-to-end example of combining a few ideas together!

.svg)
.svg)
.svg)
