Guide
Technical design document: template and diagrams from your repo
Start from an eight-section design doc template, then have Eraser draw the architecture, call sequence and data model from your repository.
A technical design document, also called a design doc or a software design document, explains a change such as a new service, a migration or a schema change before anyone builds it. The diagrams are usually what holds it up, because drawing the current system from memory takes an afternoon and still comes out wrong.
This guide gives you a template and a way to get the diagrams without redrawing the system. You write the text in Eraser, where one file holds the document and its diagrams, and Eraser’s AI draws the architecture diagram, the data model and the call sequence from your repository. The diagrams take about half an hour, and the doc is then ready for its design review.
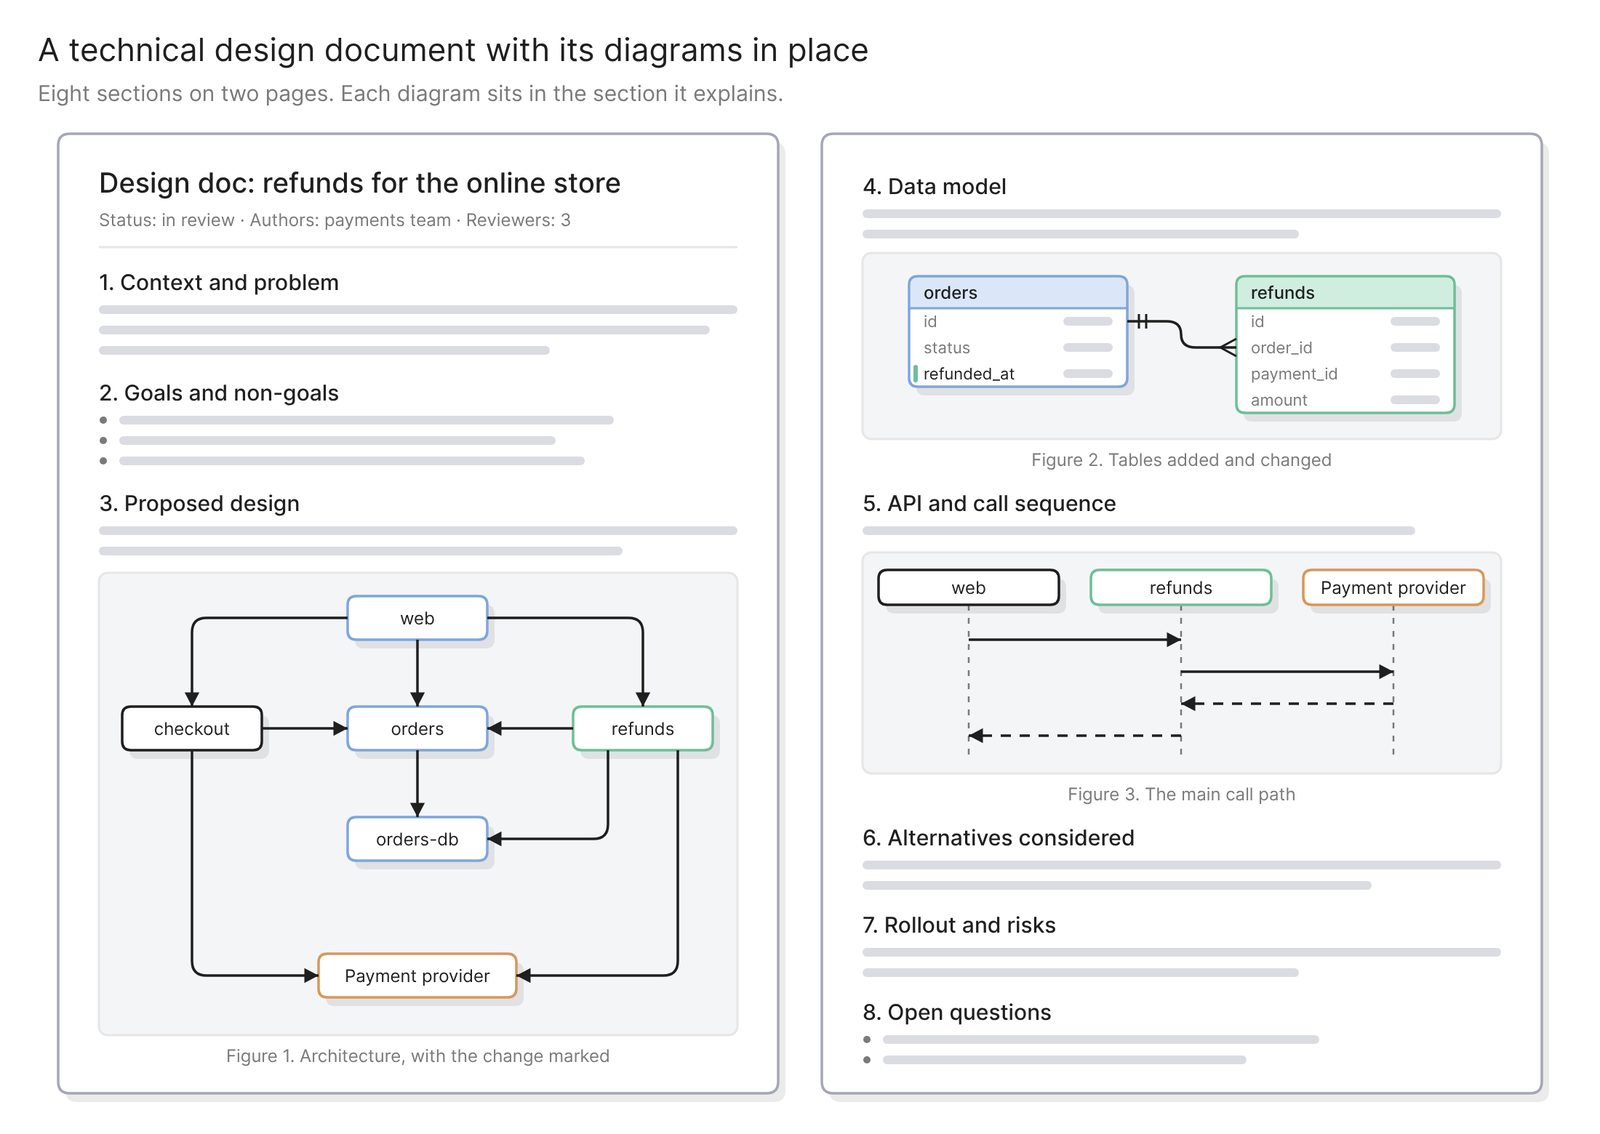 Example: a design doc for a refunds service, with each diagram in the section it explains
A technical design document template
Eight sections cover most changes. Copy the headings and delete what a small change does not need.
| Section | What goes in it | Diagram |
|---|---|---|
| Context and problem | What exists today, and what is wrong or missing. Facts only. | Current architecture |
| Goals and non-goals | What the change must achieve, and what it will not try to do. | |
| Proposed design | What is added, what changes and what stays, then the trade-offs. | Architecture with the change marked |
| Data model | New and changed tables, their keys, and what happens to existing rows. | Entity relationship diagram |
| API and call sequence | New endpoints, and the order of calls on the main path. | Sequence diagram |
| Alternatives considered | Other designs that meet the goals, and why each one lost. | |
| Rollout and risks | How it ships, how it rolls back, and the security and privacy impact. | |
| Open questions | What is still undecided, each with an owner. |
The first six follow Malte Ubl’s account of design docs at Google. The last is the “Unresolved questions” section of the Rust project’s RFC template.
Before you start
You need two things:
- Access to Eraser
- Access to the repository the change touches. A public repository needs no connection
Eraser reads the files in the repository. It cannot see what is deployed, services in other repositories, or your proposal, which is not in the code yet. The change comes from your description of it.
Step 1. Start the doc and connect the repository
Create a file in Eraser and paste the eight headings into its document. A file has two parts, a document for the text and a canvas for the diagrams, so what you draw next sits beside the text.
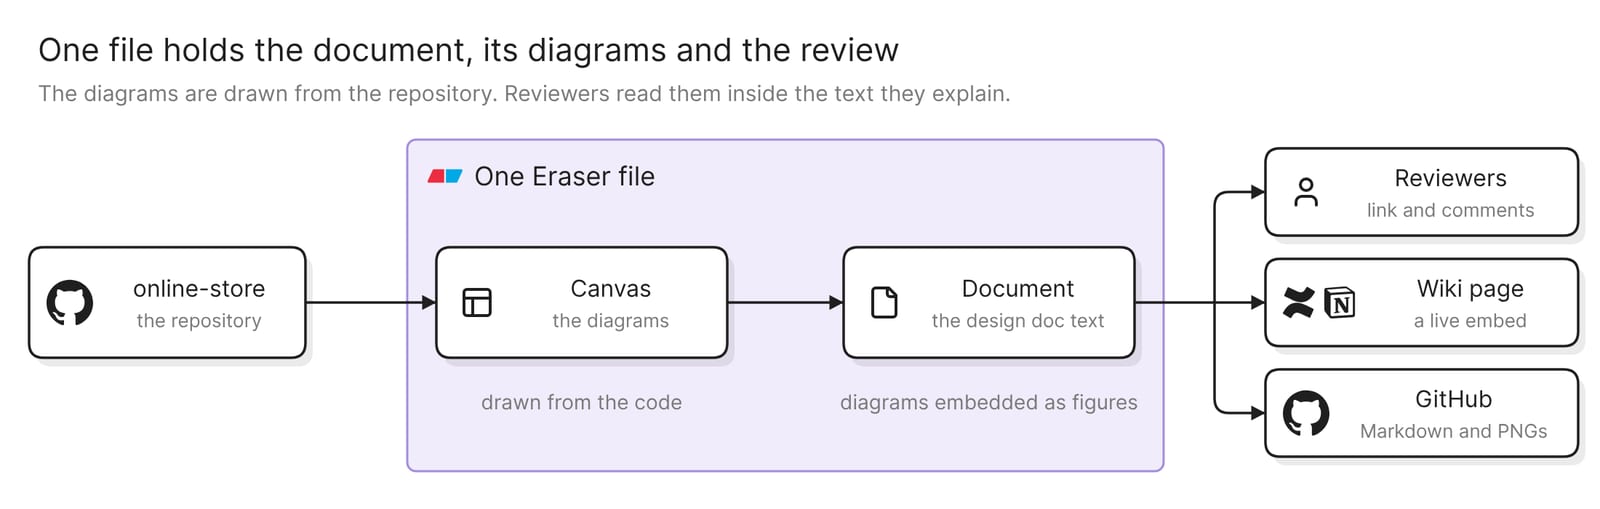 How one file holds the document, its diagrams and the review
For a private repository on GitHub, you install the Eraser GitHub App and choose which repositories it can read. GitLab and Azure DevOps connect with an access token. The docs have the steps for each.
Write the context and the goals before you draw anything.
Step 2. Draw the current state from the repository
Start an AI diagram, attach the repository, and ask for the part of the system the change touches:
Draw an architecture diagram of the services in this repository that take
part in orders and payments. Use docker-compose.yml and the code under
services/. Show each service, its data store and the external systems it
calls, with the names used in the code.
Eraser scans the relevant files and draws the services, the database and the calls between them. Naming the files that define what runs usually gives a better result.
Check three things:
- The names match the code. A box says
ordersororders-db, the way the repository does. - The external systems are there. A payment provider is an SDK import or a URL in a config file, so it is the first thing to go missing.
- Nothing is invented. A cache that the repository does not define should not be on the diagram.
This diagram goes under “Context and problem”. The guides to architecture diagrams from a codebase and C4 diagrams from a GitHub repo cover this step in more depth.
Step 3. Draw the proposed change
Ask for a second diagram, with the repository still attached, and describe the change in the prompt:
Draw the same services again with this change applied. Add a new refunds
service. The web app calls it. It calls the payment provider to refund the
charge, calls the orders service to mark the order refunded, and writes to
a new refunds table in orders-db. Color what is new green and what changes
blue.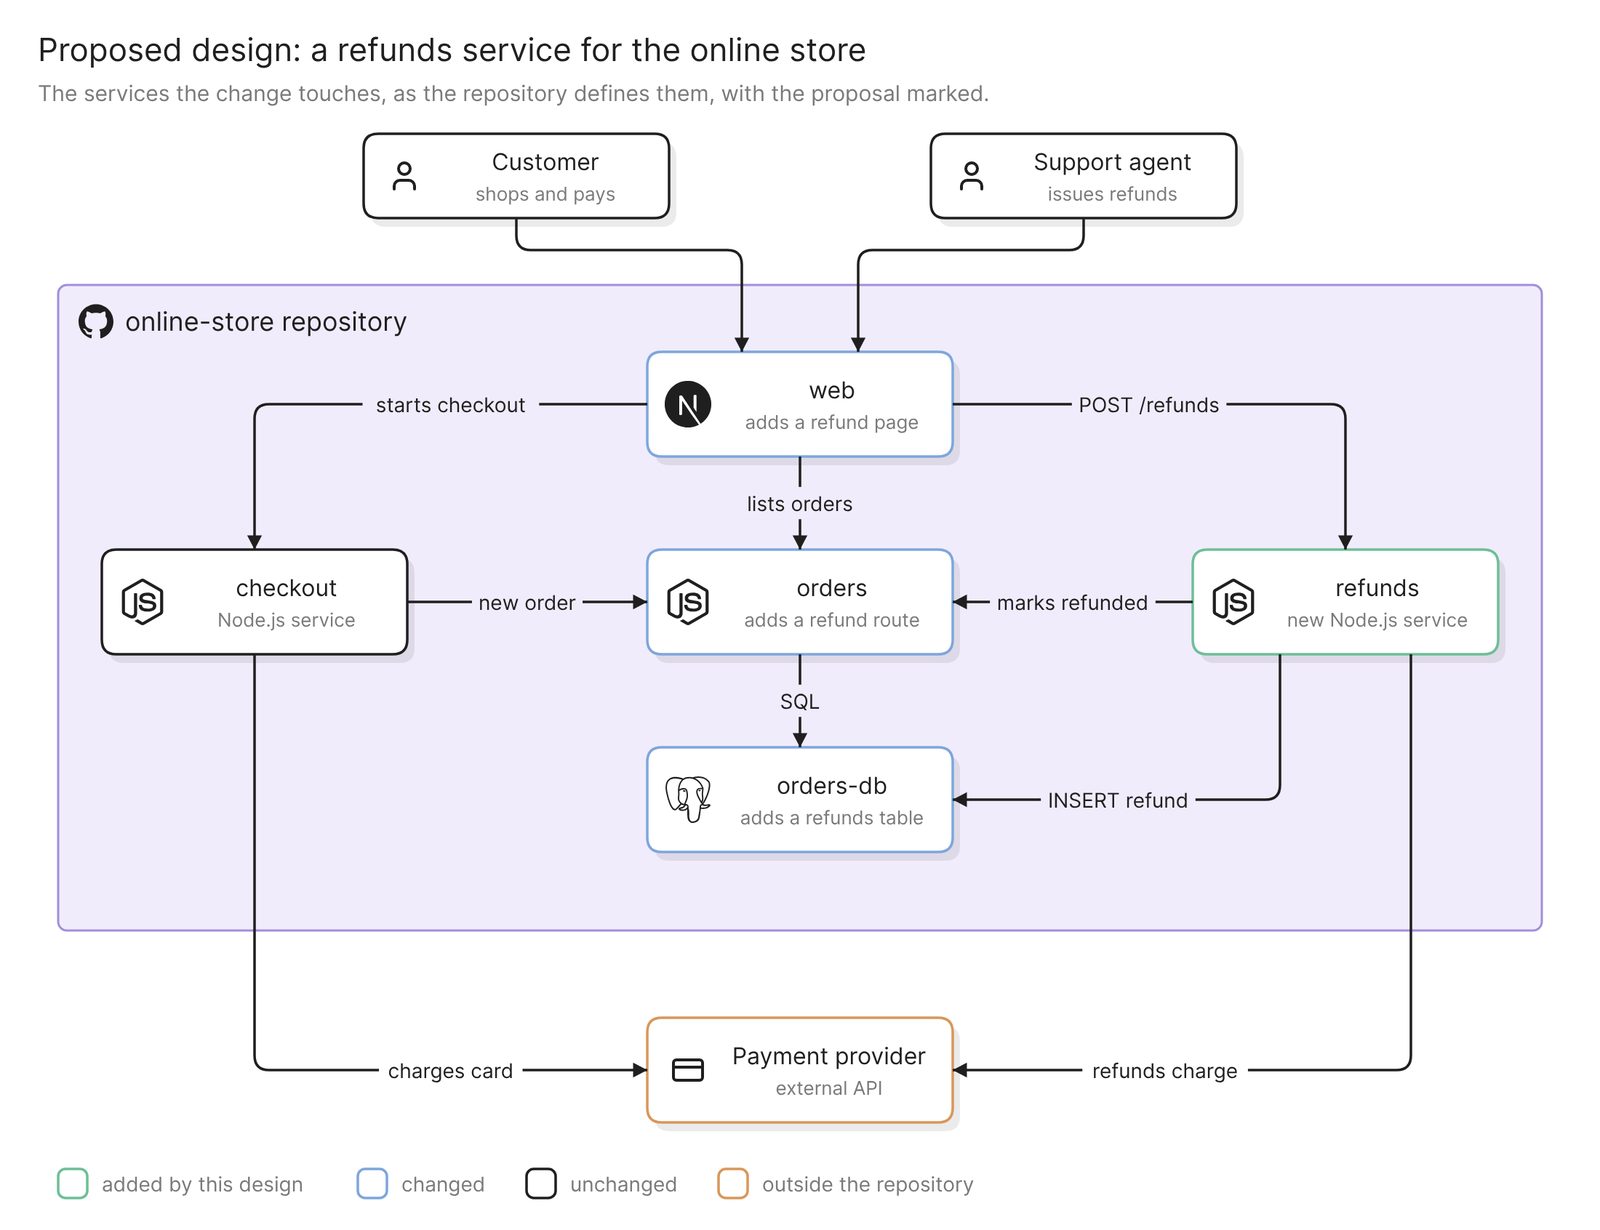 Example: the proposed design, with the new service in green and the parts it changes in blue
Check that every new arrow is a call you intend to build and points the way the call goes. Then compare the unchanged parts, and their names, with the diagram from Step 2. If the two disagree about what exists today, the review will be about the diagrams.
Keep both, so a reviewer sees before and after.
Step 4. Add the data model and the call sequence
Two more diagrams carry the detail, each from its own request.
Draw an entity relationship diagram of the orders and payments tables in
db/schema.sql, plus a new refunds table with id, order_id, payment_id,
amount, reason, status and created_at. Add a refunded_at column to
orders. Leave out every other table.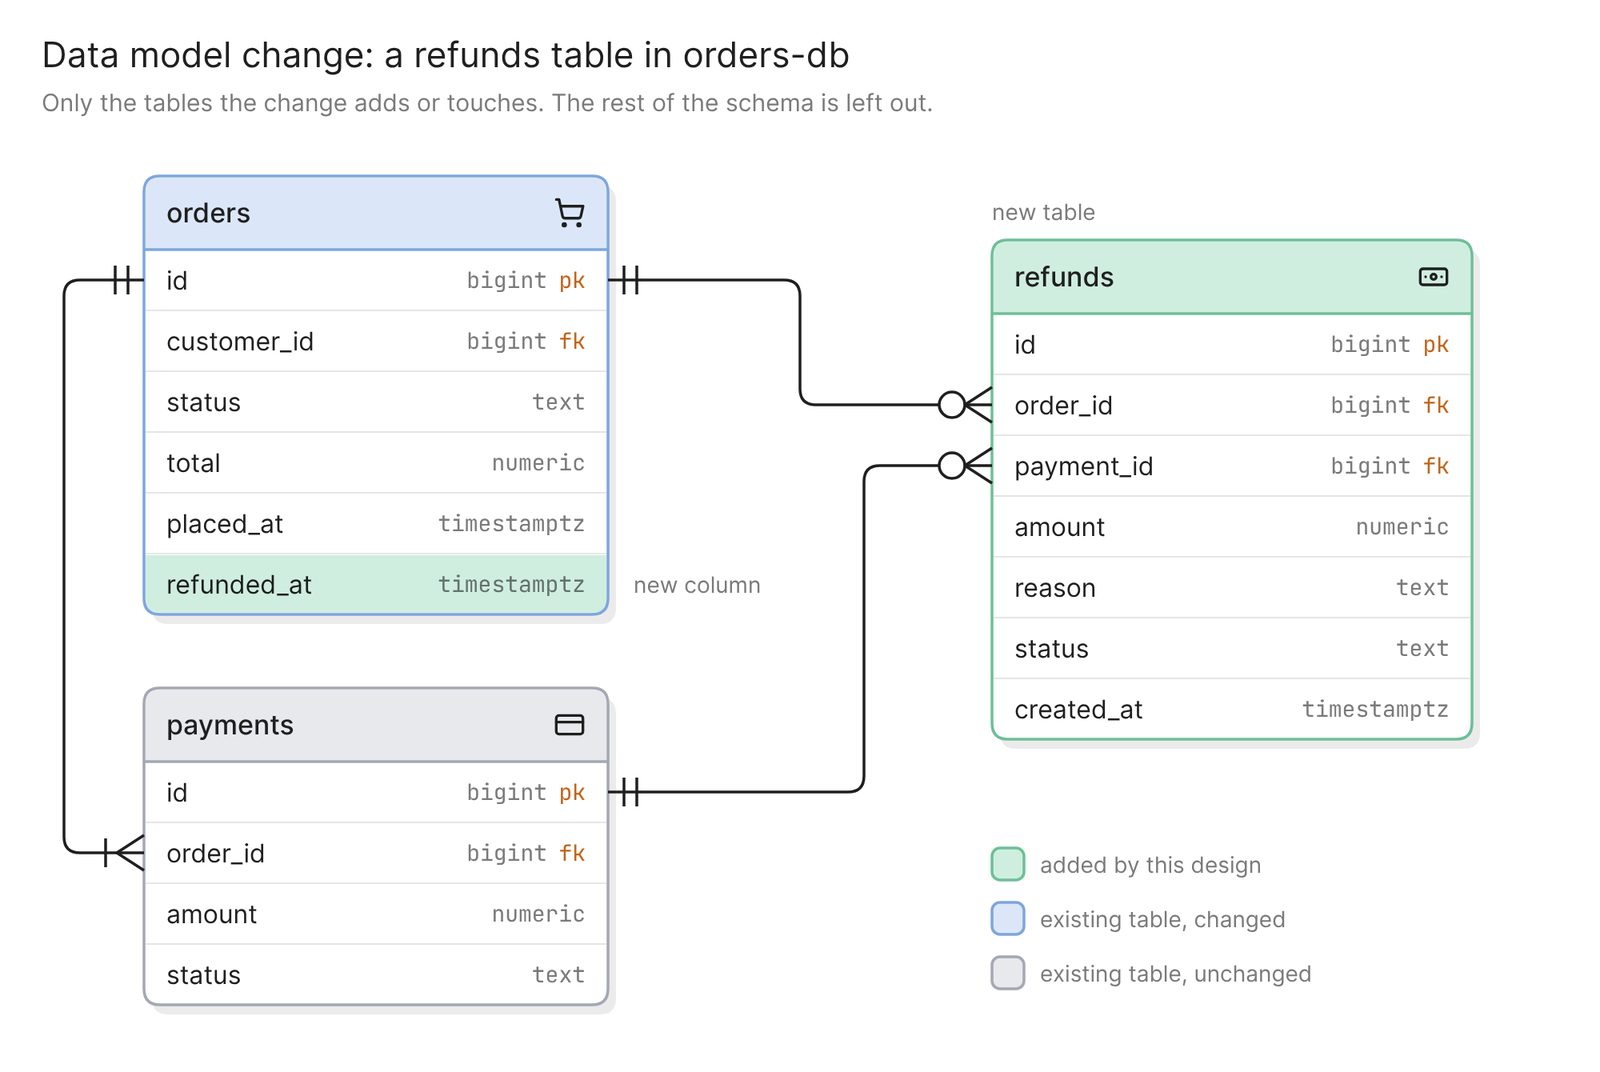 Example: the data model change, with the rest of the schema left out
Keep the entity relationship diagram to the tables the change adds or touches. Ubl’s advice on data storage is that “copy-pasting complete schema definitions should be avoided”, and that applies to a diagram of the whole database too. Check each foreign key against the schema file.
Draw a sequence diagram of a support agent refunding an order, across the
web app, refunds, orders, orders-db and the payment provider. Use the
route names in services/orders for the calls that exist today, and
POST /refunds for the new one.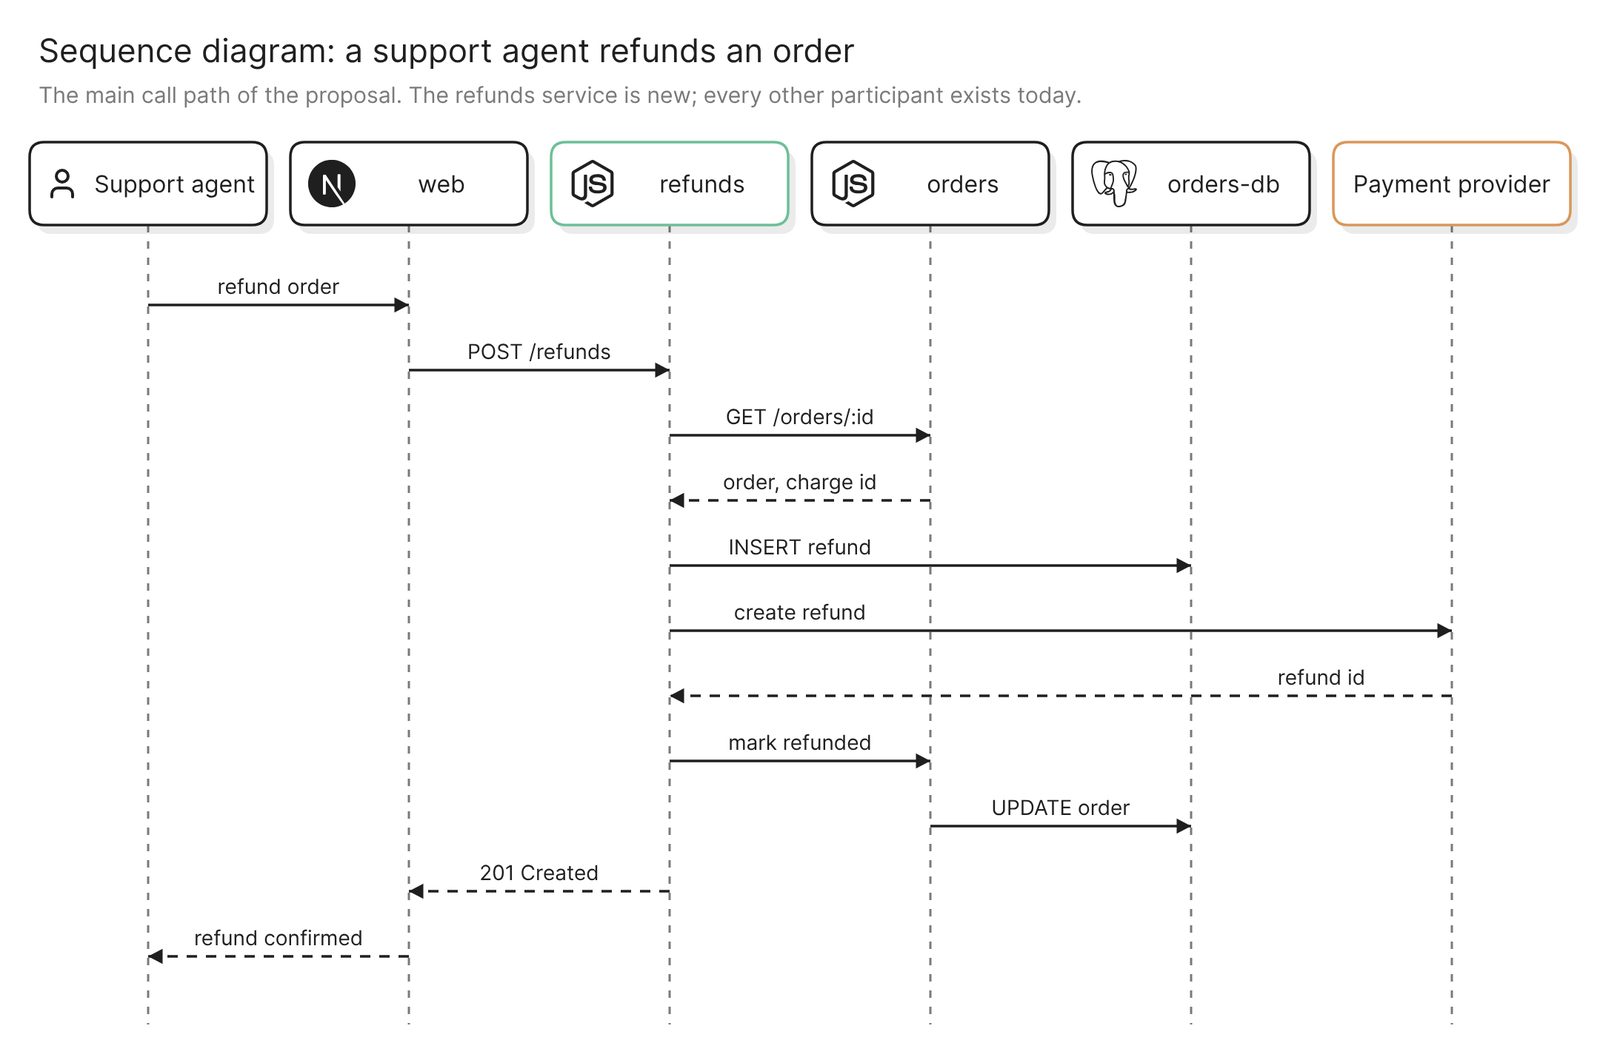 Example: the main call path of the proposal
Read the sequence diagram from top to bottom and ask what state the system is in if it stops after each arrow. In this example the refund row is written before the payment provider is called. A crash between the two leaves a pending refund to reconcile, and that belongs under “Rollout and risks”.
Get it ready for review
- Put each diagram where it is discussed. Wrap it in a figure on the canvas and paste the figure into the document under its section. The embed is a live preview, so a later edit to the diagram shows in the text. The docs have the steps.
- Write down the shortcuts. A second service writing to
orders-dbis deliberate technical debt. Say so under “Rollout and risks”. - Ask for comments. Share the file with a link. Signed-in reviewers comment on a sentence or on a spot in a diagram, and you can mention the teammate who needs to answer.
Keep it current
Nothing redraws these diagrams when the design changes, so update the doc while the review runs. Edit a diagram by hand or with another prompt, and the figure in the document follows. Ubl’s rule of thumb for a system that has not shipped is to “definitely update the doc”.
After the review, Eraser exports the document as Markdown or PDF and embeds it live in Confluence and Notion. With Git sync, a doc kept in a synced GitHub repository is committed as Markdown, with its diagrams as PNG images. For a diagram that should track the code after launch, an Eraserbot monitor redraws it when a pull request changes the files it watches.
Other ways to write a design doc with diagrams
- Use a template in your wiki or document editor. Confluence can start a page from a template, and Ubl writes that most design docs at Google are created in Google Docs. This is the right choice when your reviewers already work there. Diagrams pasted in as images go stale as soon as the design changes, and the editable source lives somewhere else.
- Keep the doc as Markdown in the repository. The Rust project reviews each RFC as a Markdown file in a pull request. GitHub renders Mermaid in Markdown files and pull requests, and Mermaid has syntax for sequence and entity relationship diagrams. It suits a team that wants the doc versioned with the code. Every diagram is written by hand. Best diagram-as-code tools in 2025 compares the options.
- Write an architecture decision record. An ADR is, in Michael Nygard’s original description, “a short text file” for one decision. It is the better fit when the change comes down to a single choice, such as which database. It does not carry a data model or a rollout plan.
- Ask a coding agent. Claude Code and similar agents can write the document and its diagrams into Eraser through its MCP server. This guide covers that route.
FAQ
Is a software design document the same as a technical design document?
In everyday use, yes. The same kind of document is a design doc at Google and an RFC in the Rust project, and the template above fits either.
How long should a technical design document be?
Short enough that busy people read it. Ubl puts the sweet spot for a larger project at “around 10-20ish pages” and says a “1-3 page” version suits an incremental change.
Can Eraser’s AI write the document as well as the diagrams?
It can draft it. A team can save its design doc skeleton as a template, and the AI fills that structure out from a prompt. It can also write a description of a diagram into the document. The goals and the trade-offs are still yours to write.
Do I have to connect a repository?
No. A public repository needs no connection, and a diagram can also start from a description, pasted code such as a SQL schema, or an uploaded file.
Where to go next
To try one diagram before writing a whole doc, the architecture diagram generator and the sequence diagram generator each draw from a description. AI documents and design docs show the document side of Eraser.
The glossary covers system design. For reference diagrams, see the eCommerce website data model and the data flow diagram for online payments.